
The snow globe—a seemingly miraculous object containing an entire blizzard within a small glass sphere—was invented by Erwin Perzy in Vienna at the beginning of the 20th century. Today, snow globes are simultaneously cliché and magically hypnotic. They transport you to a sentimental place where the world is cold but everyone’s hearts are warm.
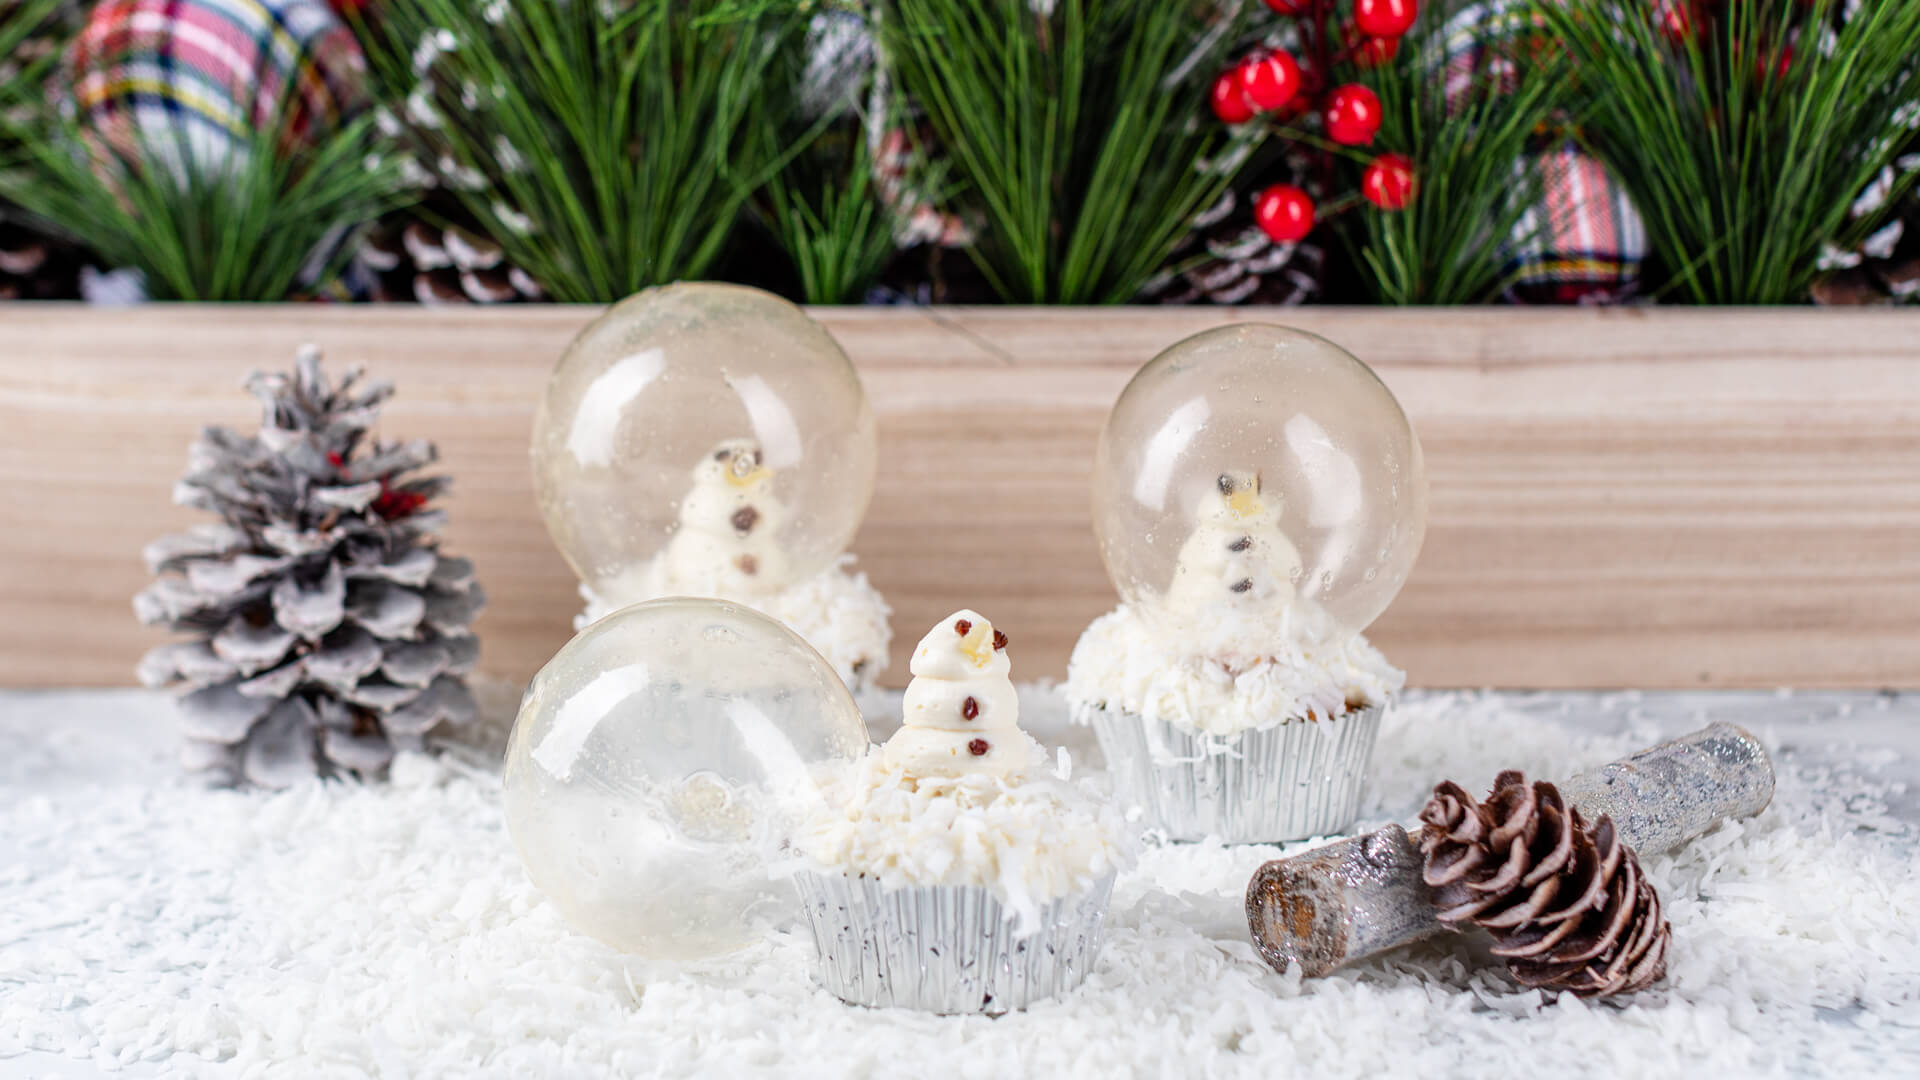
In a nod to this beloved holiday decoration, we present the snow globe cupcake. Decorated with a sugary winter landscape, this treat is topped with a transparent bubble that evokes its namesake. The English may have their figgy puddings, and the French their bûche de Noël. But in this country, where we welcome the yuletide with flashing lights and glittering plastic lawn ornaments, snow globe cupcakes symbolize the American holiday season in all its shameless, sugarcoated glory.
Angie Dudley (aka Bakerella, the genius who brought cake pops to fame) created the first snow globe cupcake. She used the bottom of a plastic Coca-Cola bottle to represent the globe. Then Sugar Hero’s Elizabeth LaBau improved upon this recipe with a completely edible version. Her method is as simple as it is brilliant. She dipped a small balloon into melted gelatin, let the gelatin harden, and then deflated the balloon, leaving a clear gelatin bubble. However, LaBau’s earliest attempts with powdered gelatin yielded cloudy, unsatisfactory results. In order to get the proper crystal-like sparkle, LaBau finally settled upon platinum-grade sheet gelatin. Sheet gelatin is an ingredient commonly used by European cooks but are rather new to Americans.
Our cupcake is a basic vanilla cake topped with buttercream frosting. But other cake flavors work just as well—perhaps you’d like to try retro red velvet or gingerbread? Whatever flavor you choose, be prepared for lots of oohs and aahs from the guests at your next holiday party.
Ingredients
Cupcakes
175 g cake flour
150 g granulated sugar
3.5 g salt
3.5 g baking soda
3.5 g baking powder
3 g glycerol monostearate (GMS)
85 g whole milk
85 g canola oil
60 g water
40 g beaten egg (1 large egg)
6 g pure vanilla extract
Buttercream Frosting
115 g unsalted butter, at room temperature (1 stick)
230 g confectioners’ sugar
2.5 g salt
23 g water
7 g pure vanilla extract
0.3 g sucrose esters
Gelatin Globes
18 platinum-grade gelatin sheets
water
42 g granulated sugar
Garnish
Dried cocoanut flakes
Dried currants
Candied ginger
Equipment
- Sifter
- Stand mixer
- Muffin Tin
- 12 paper baking cups
- 12 small water balloons
- String
- Double boiler (or heat-proof bowl that fits on top of a small saucepan)
- Scotch tape
- Needle or small pin
Timing
Cupcakes
Active time: 30 minutes
Total time: 2 hours
Buttercream Frosting
Active time: 10 minutes
Total time: 15 minutes
Gelatin Globes
Active time: 30 minutes
Total time: 48 hours
Yield
12 cupcakes
375 g buttercream
12 globes
The More You Know…
(Almost) Plain Vanilla
Our vanilla cupcake is the standard “yellow cake” that is much beloved at birthday parties from coast to coast. Yellow cake, like the cupcake itself, is an American invention. It’s almost as easy to make from scratch as it is from a box mix—and a million times tastier.
Perfect yellow cake is moist and feather light, with a velvety crumb. We use canola oil instead of butter to achieve the ideal balance of airy and moist. Cake flour produces a finer texture than all-purpose flour thanks to its lower protein (gluten-producing) content. And whole eggs give the cake its golden hue.
The secret ingredient we’ve added is glycerol monostearate (GMS), which acts as an emulsifier to bind the oil and hydrated starch in the batter. When oil and starch separate, baked goods begin to get stale; just a small amount of GMS will add moistness and help extend the life of your cupcakes.
In the Mix
Two-stage mixing is fundamental to making batters. Whisk together the wet ingredients in one bowl; sift together the dry ingredients in another (sifting distributes the dry ingredients thoroughly). Then, gradually incorporate the dry ingredients into the wet.
All Buttered Up
As the name implies, butter is the base of a proper buttercream frosting. When beaten together with the other ingredients, the butter aerates and doubles in volume. We like to also add sucrose esters to our buttercream. This emulsifier helps bind the butter and water to prevent the frosting from separating or “weeping.”
Go for the Platinum
On American grocery store shelves, unflavored gelatin is typically sold in powder form. While this may be okay for making Knox Blocks, it’s not ideal for many applications, including our snow globes. Gelatin powder is hard to measure reliably, lacks consistent gelling power, and tends to contain impurities. As a result, snow globes made from it will be cloudy and irregularly shaped.
Sheet gelatin (sometimes called leaf gelatin) has traditionally been preferred by professional pastry chefs worldwide. Its primary benefits are ease of use and measurement, consistent gelling strength, and purity.
As the name implies, sheet gelatin comes in transparent sheets, which are graded from lowest to highest gelling power and purity: titanium, bronze, silver, gold, and platinum. The gelling power is also known as the gelatin’s “bloom strength,” named after Oscar Bloom, who patented the first test for measuring the thickening properties of gelatin. The higher the bloom strength, the greater the gelling capacity of a given amount of gelatin in the same amount of liquid.
Platinum-grade gelatin has the highest bloom strength, which means that it has greatest gelling power. It is also the purest gelatin available, being extracted over the longest period of time and at the lowest temperature. Accordingly, platinum gelatin is lighter and clearer than any other gelatin and is virtually odorless and flavorless.
One last note: Preparing sheet gelatin requires that it be hydrated in cold water before it can be dissolved in hot liquid. This process of hydration is referred to as “blooming” the gelatin. However, blooming has no relation to Oscar Bloom or bloom strength. Yes, we agree, it’s a little confusing. But now you know.
-
Cupcake.
1. Preheat the oven to 350°F/176°C
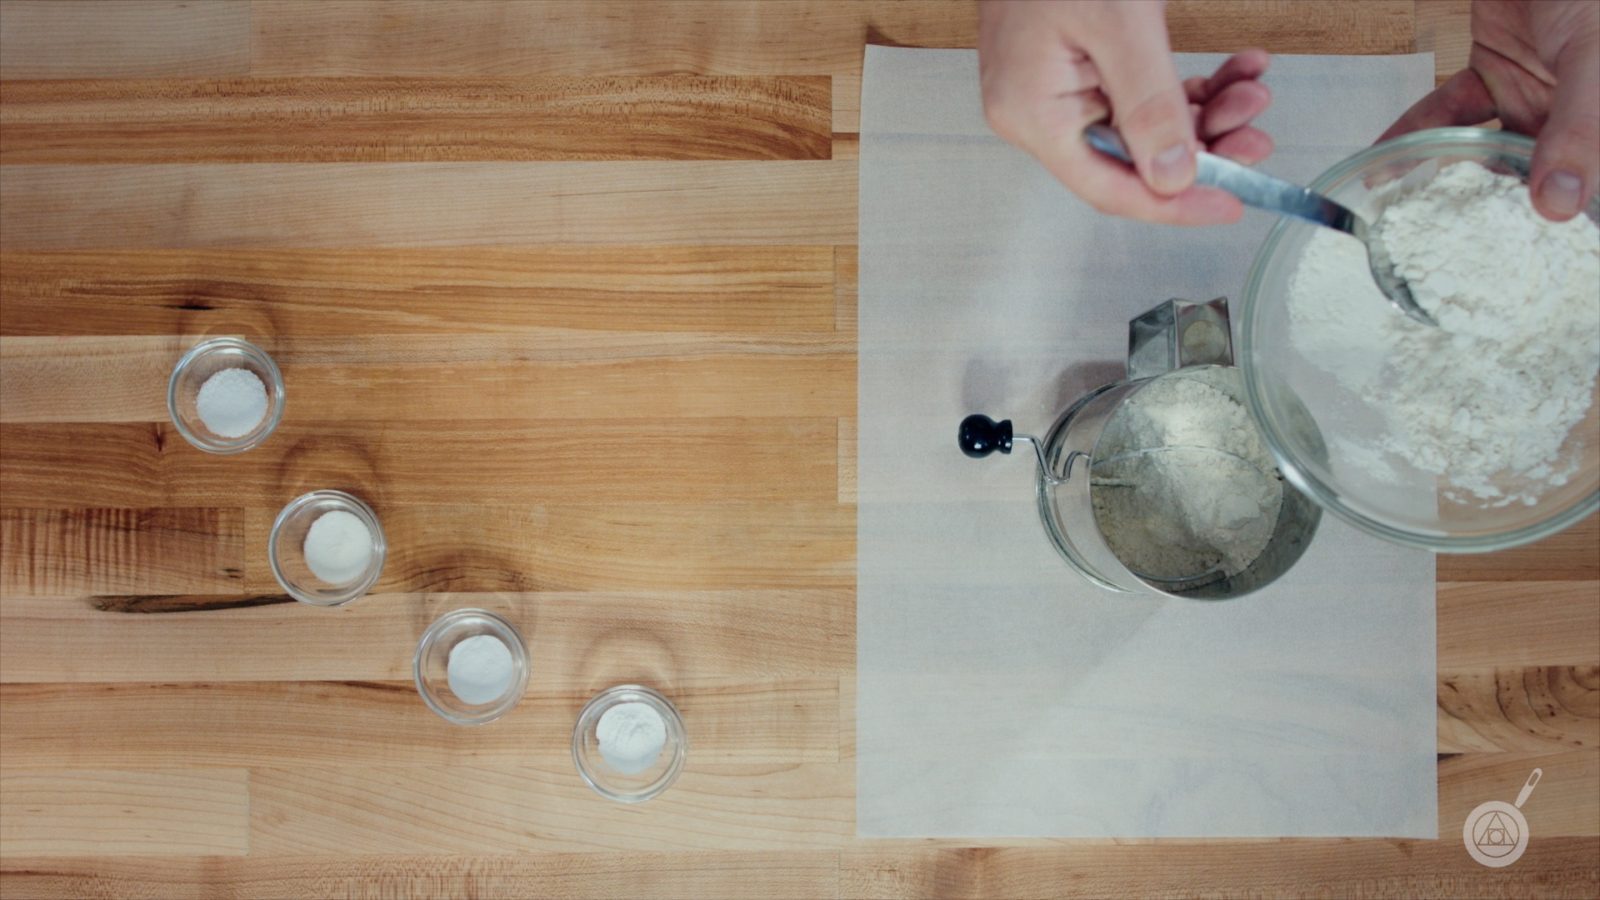
2. Sift together dry ingredients
175 g cake flower
150 g granulated sugar
3.5 g salt
3.5 g baking soda
3.5 g baking powder
3 g glycerol monostearate (GMS)Sift together all of the dry ingredients onto a piece of parchment paper and set aside.
3. Mix the wet ingredients85 g whole milk
85 g canola oil
60 g water
40 g beaten egg
6 g pure vanilla extractCombine the wet ingredients in the bowl of a stand mixer with the paddle attachment. Mix on low speed for 3 minutes.
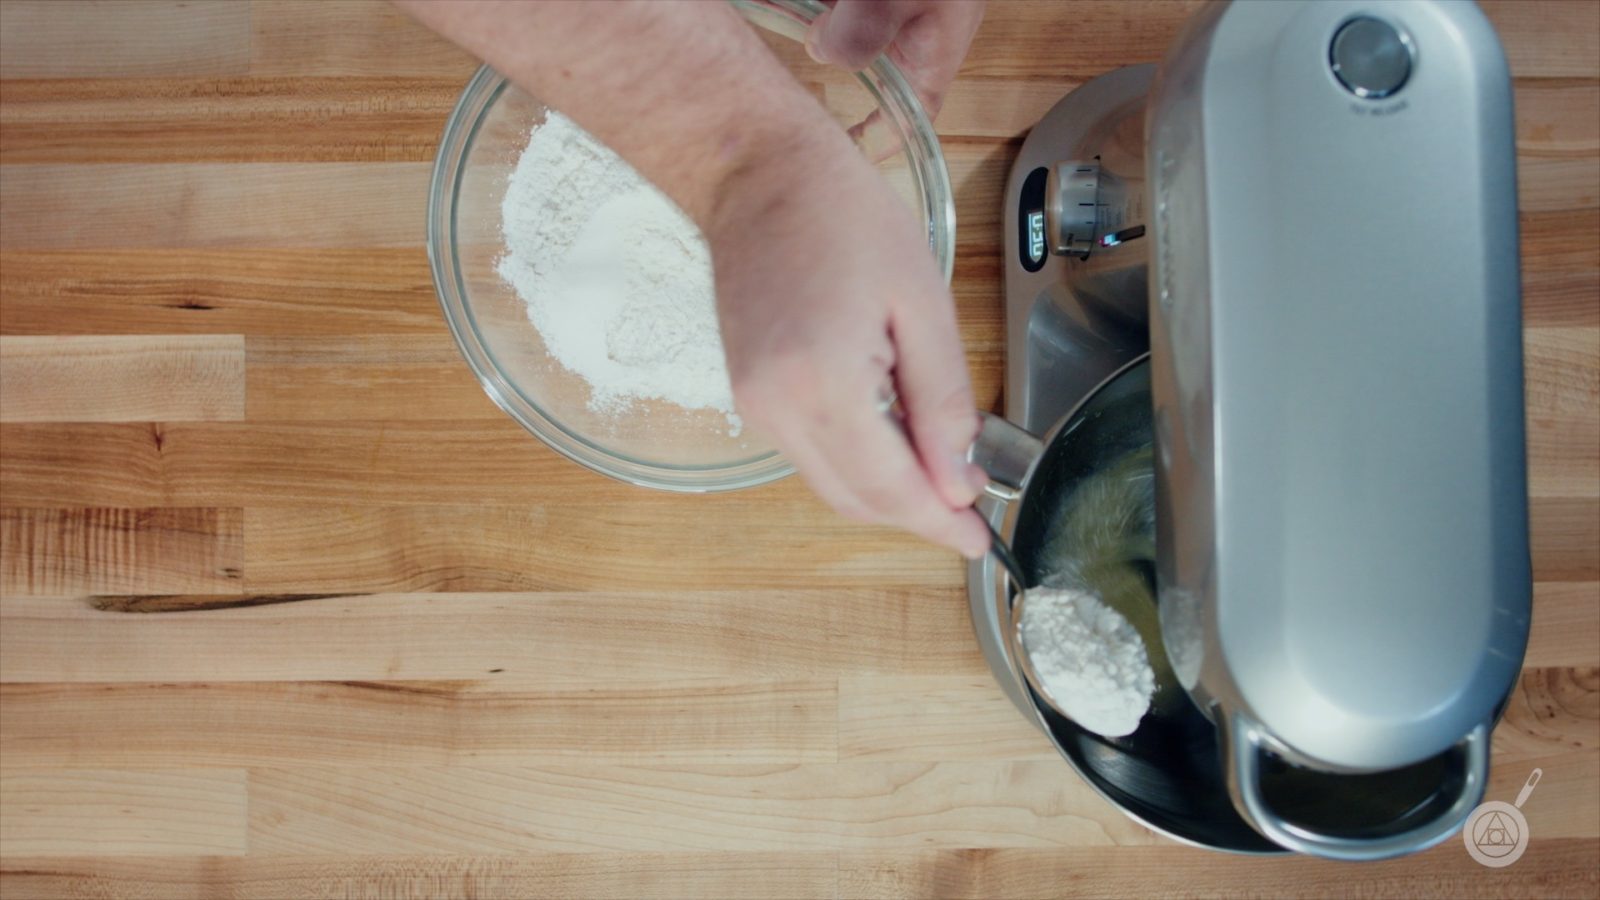
4. Combine to make the batter
With the mixer running, gradually add the dry ingredients to the bowl until everything is incorporated. Scrape down the sides of the bowl with a rubber spatula as necessary. Do not over mix.
5. Scoop the batter
Line a muffin tin with paper baking cups. Use a 1.5-ounce ice cream scoop to fill the cup with batter.
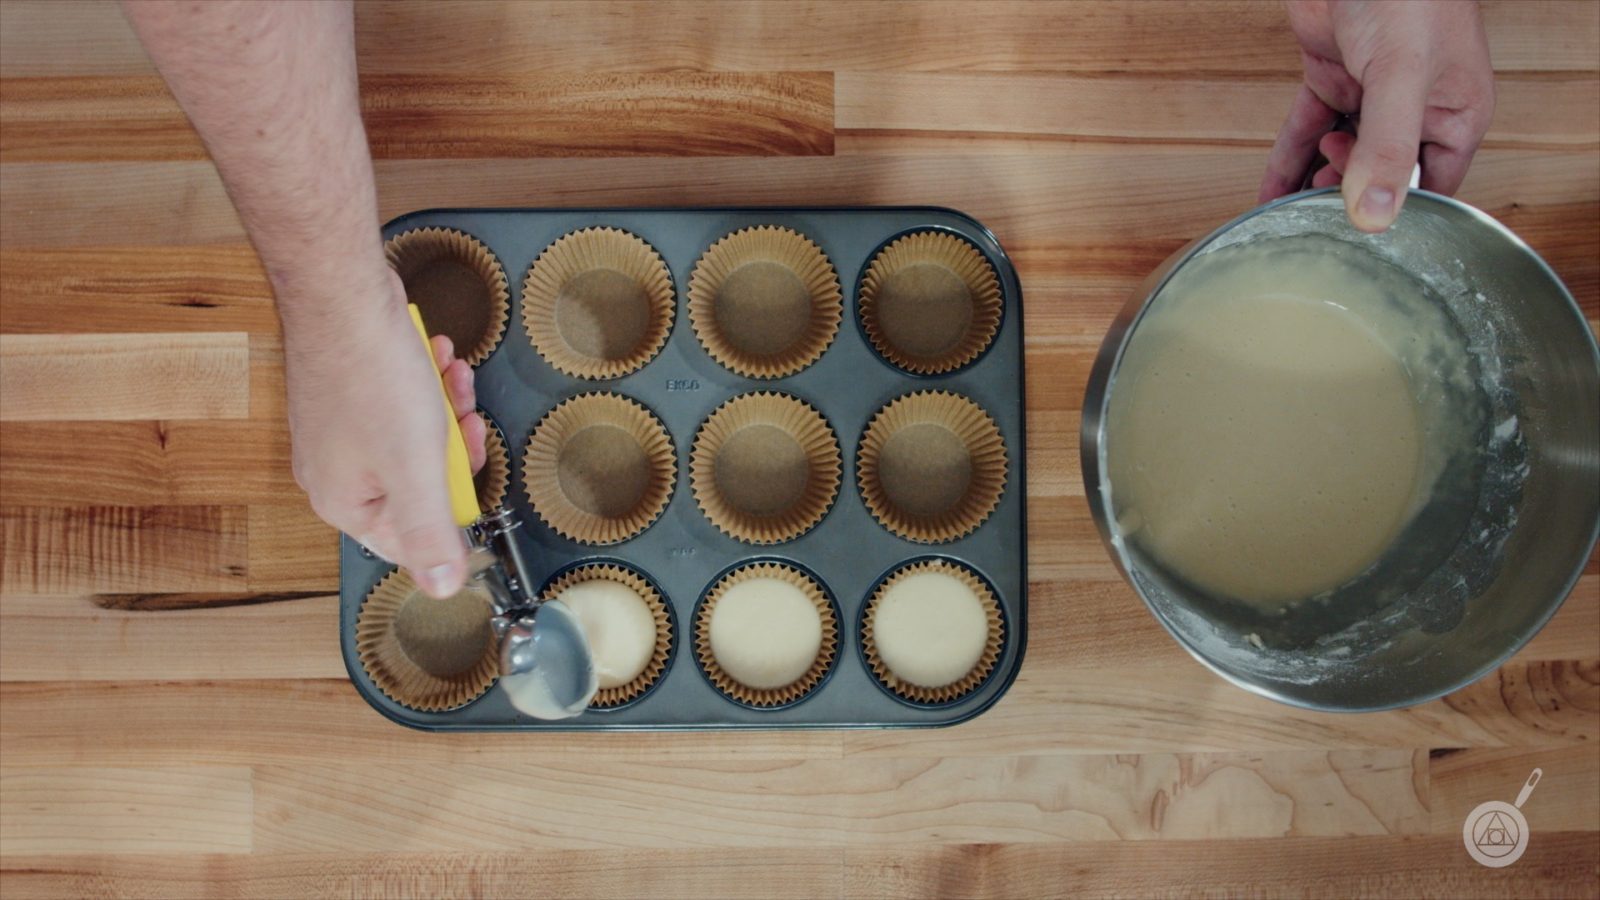
You can also weigh the batter. We find that 50 g of batter makes the perfect-size cupcakes.
6. Bake
Place the muffin tin on the middle oven rack and back for 20 minutes, rotating the tin halfway through. Remove from the oven and test the cupcakes for doneness.
The Cupcakes are done when the internal temperature reaches 205°F/96°C on an instant-read thermometer or when a toothpick stuck in the center comes out clean. If the cupcakes are not done yet, return the muffin tin to the oven for a few more minutes.
7. Cook and trim
Remove the cupcakes from the tin and set them on a wire rack to cool. They must be completely cool before you can frost them.

For a consistent look, you may want to trim the cupcake domes flat with a serrated knife before decorating.
-
Buttercream Frosting.
1. Whip the frosting
115 g unsalted butter, at room temperature (1 stick)
230 g powdered sugar
2.5 g salt
23 g water
7 g pure vanilla extract
0.3 g sucrose estersCombine all the ingredients in the bowl of a stand mixer fitted with the whisk attachment. Mix on low speed until everything is incorporated.
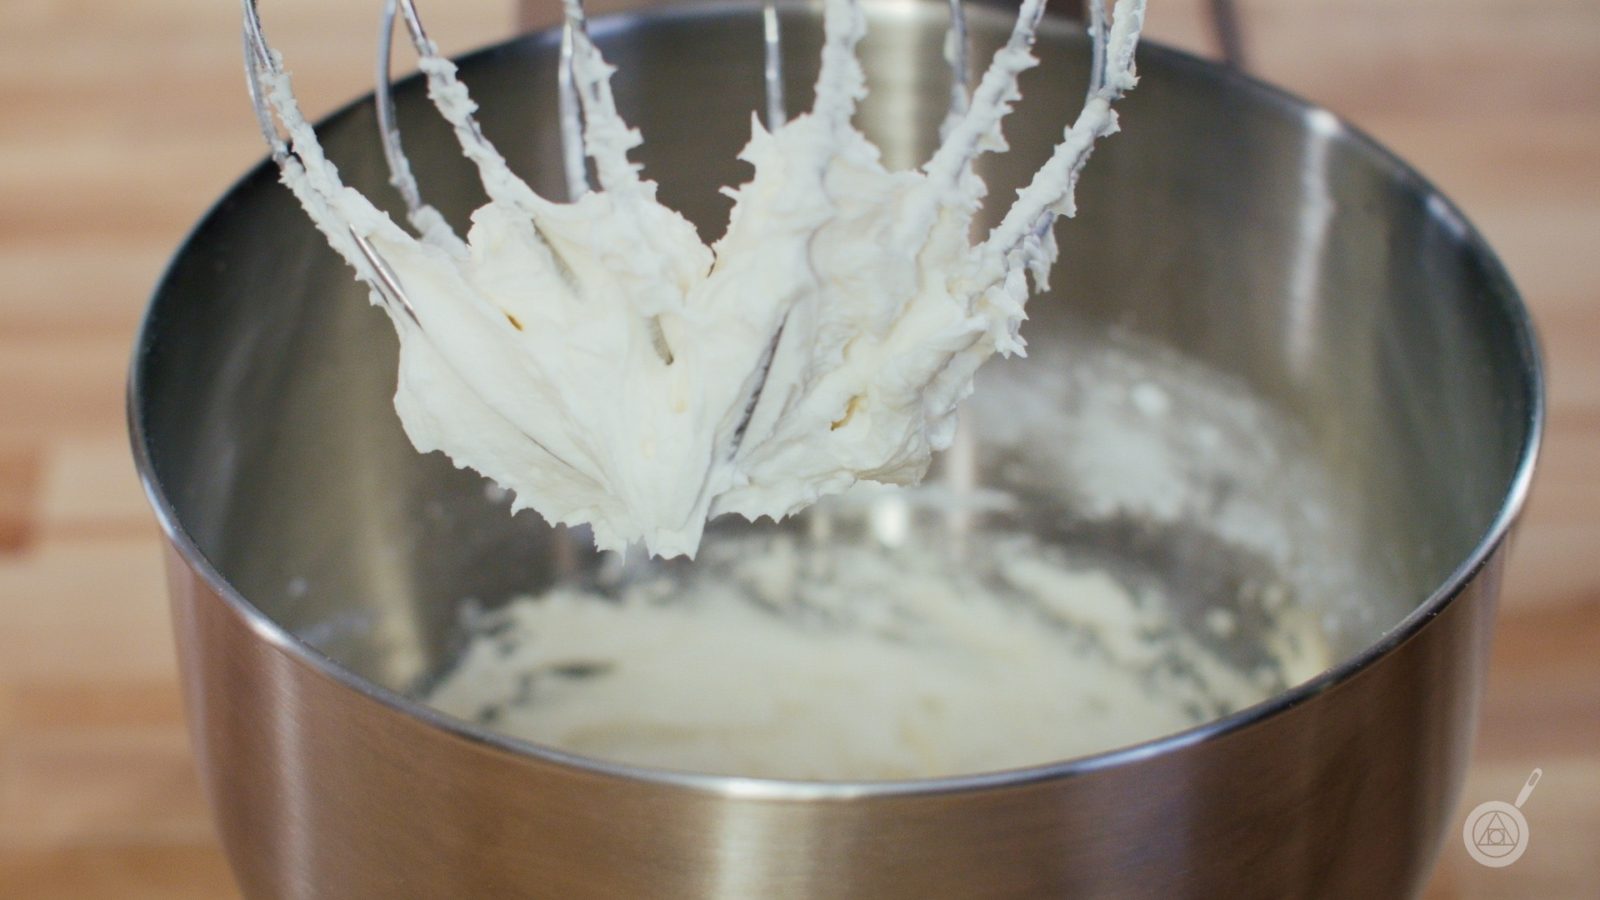
Increase to medium speed and mix until the contents have doubled in volume, about 5 minutes.
2. StoreThe frosting may be stored in a covered container in the refrigerator for up to a week.
Allow the frosting to sit at room temperature for at least 1 hour to soften before use. Do now try to speed up the softening process by heating it in a microwave or any other source of direct heat. This will cause the buttercream to melt and separate.
-
Gelatin Globes.
1. Bloom the gelatin
18 platinum-grade gelatin sheets
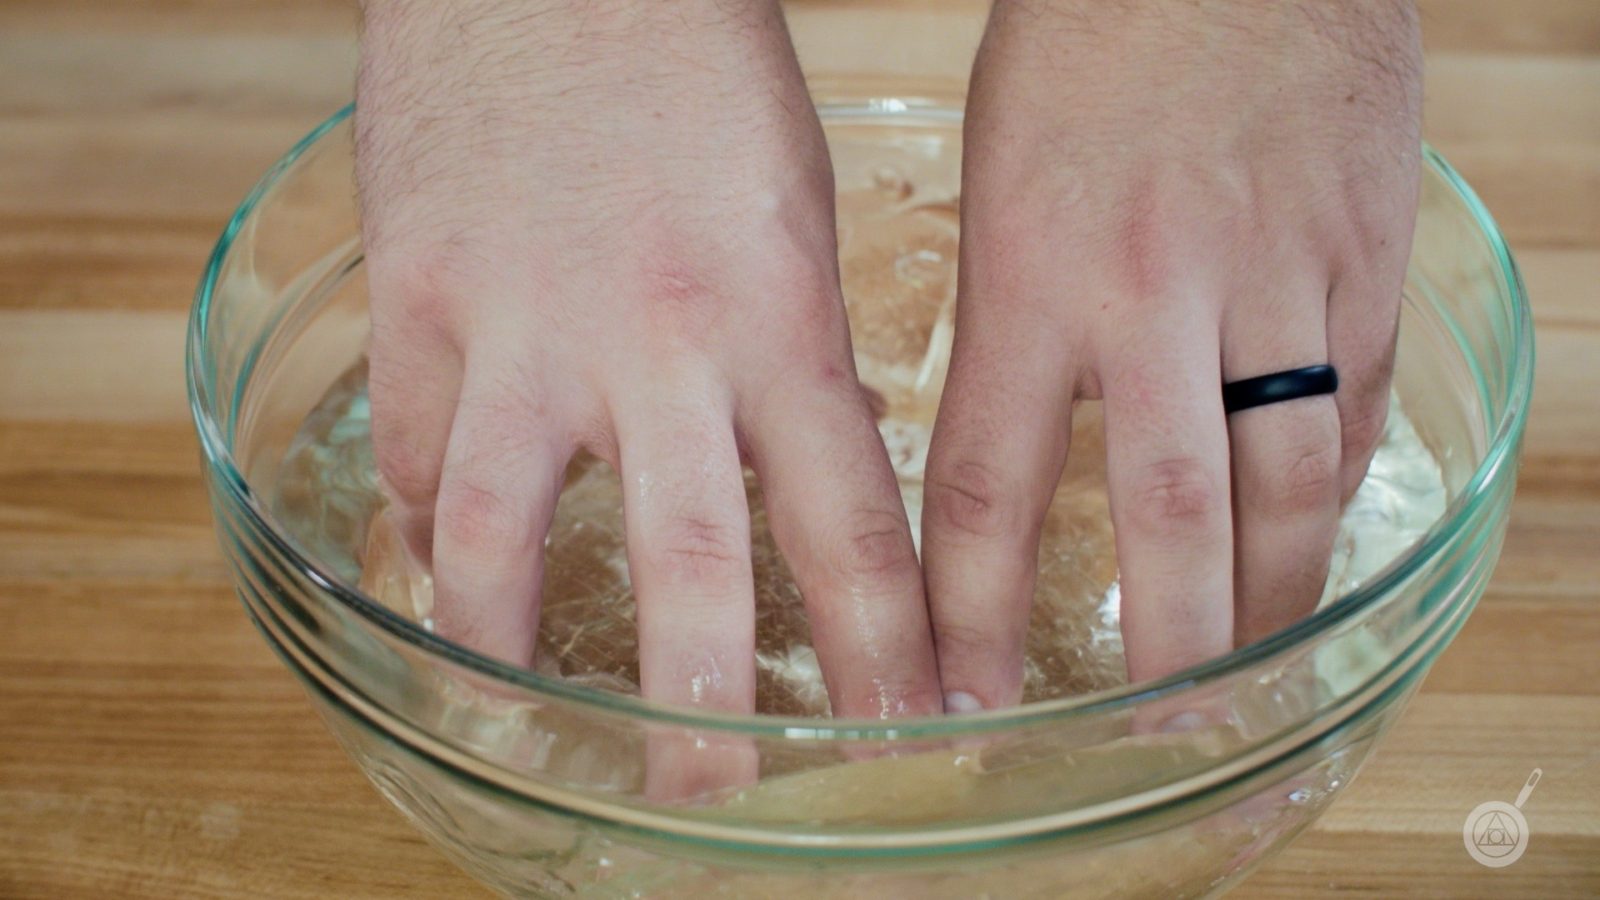
waterSeparate the gelatin sheets and submerge them in a large bowl of cold water for 5 minutes.
 2. Inflate the balloons
12 small water balloons
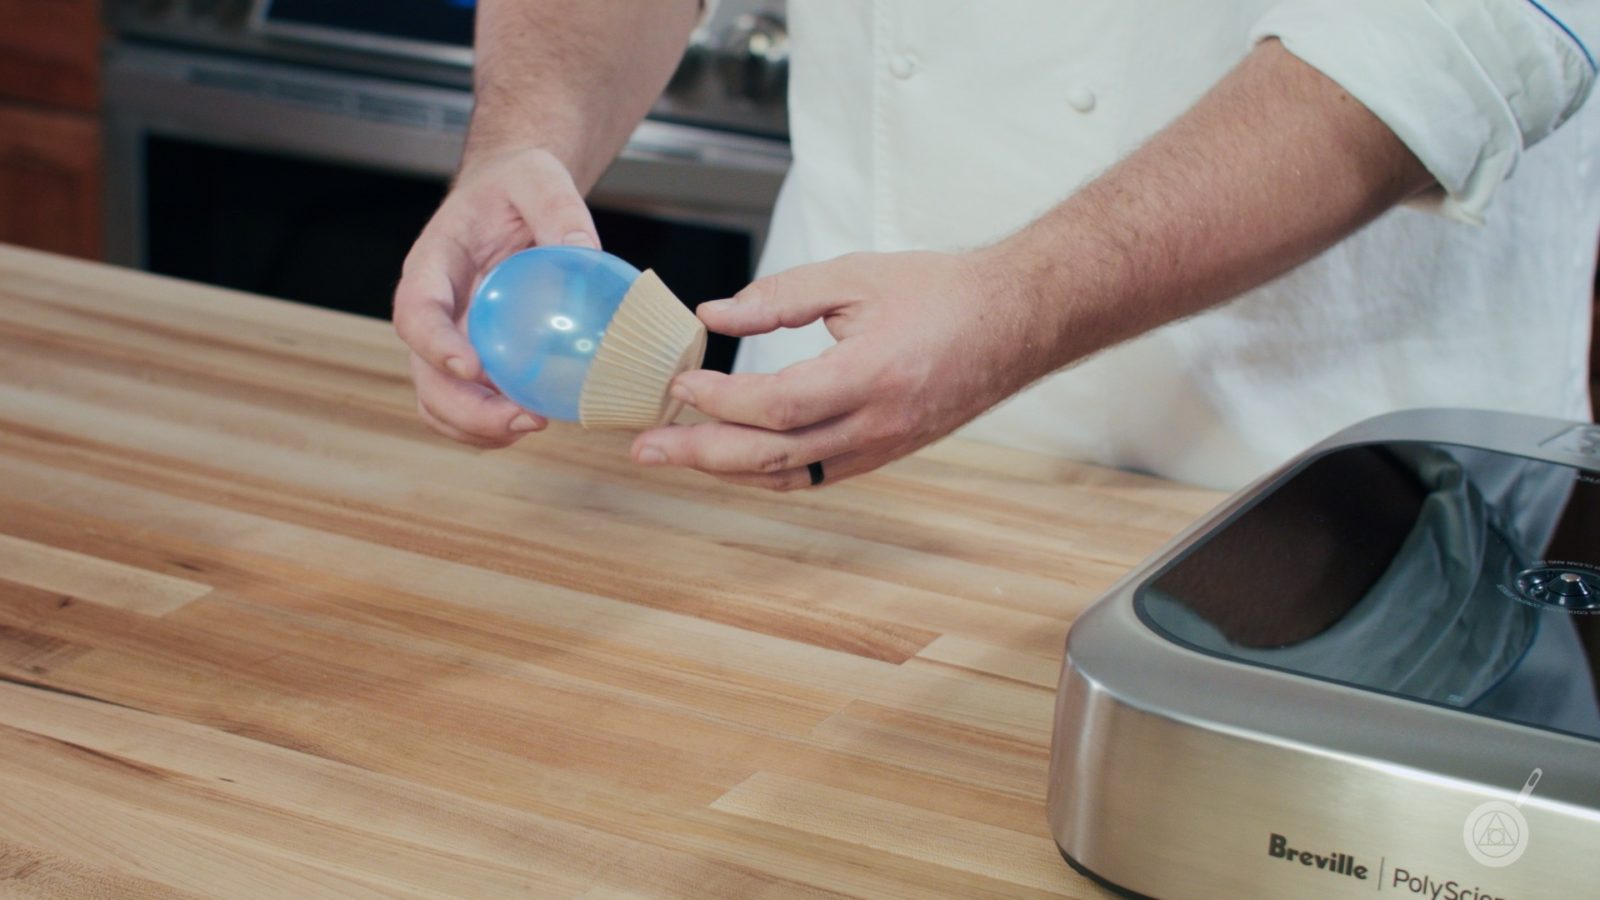
stringBlow up each balloon to the diameter of the open end of a paper baking cup. If the balloon fits snuggly inside the cup, the globe will sit properly on the cupcake.
3. Heat the gelatinwater
42 g granulated sugarFill the bottom of a double boiler or saucepan halfway with water. Squeeze out the excess water from the bloomed gelatin and transfer the gelatin to the top of the double boiler or to a heat-proof bowl that fits on top of the saucepan. Sprinkle the sugar even over the top of the gelatin.
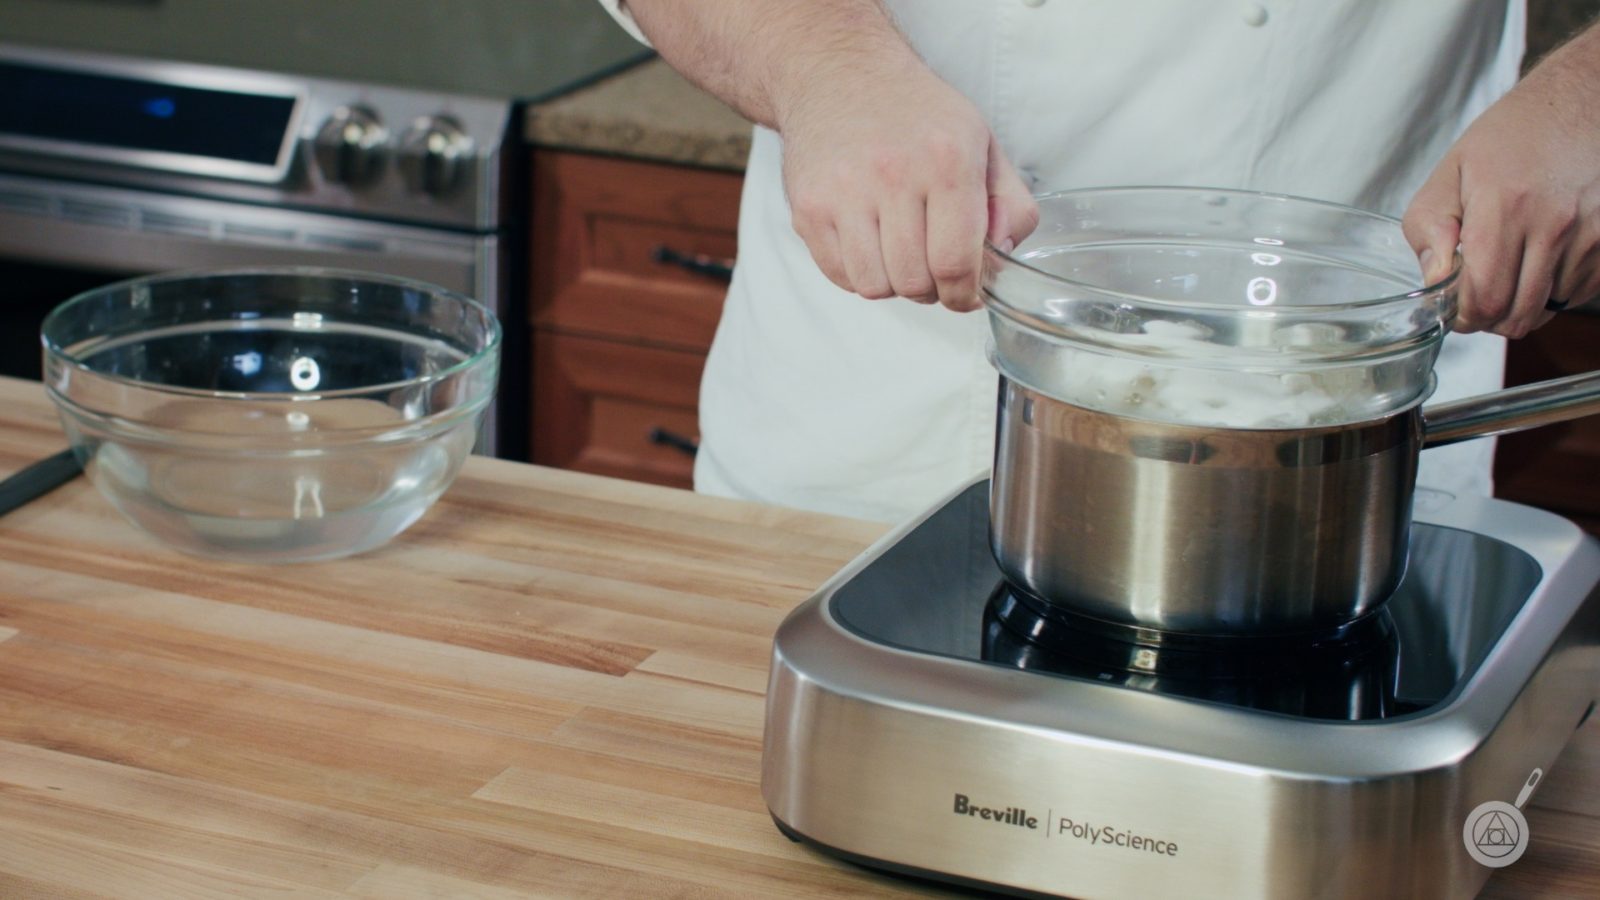
Turn the heat to medium-low and slowly heat the water in the double boiler just until the gelatin and sugar have melted. Avoid stirring the gelatin as much as possible to prevent bubbles from forming.4. Coat the balloons
Let the gelatin cool slightly, to about 130°F/55°C.Roll the round end of each balloon in the gelatin mixture, coating about three-quarters of it’s surface.
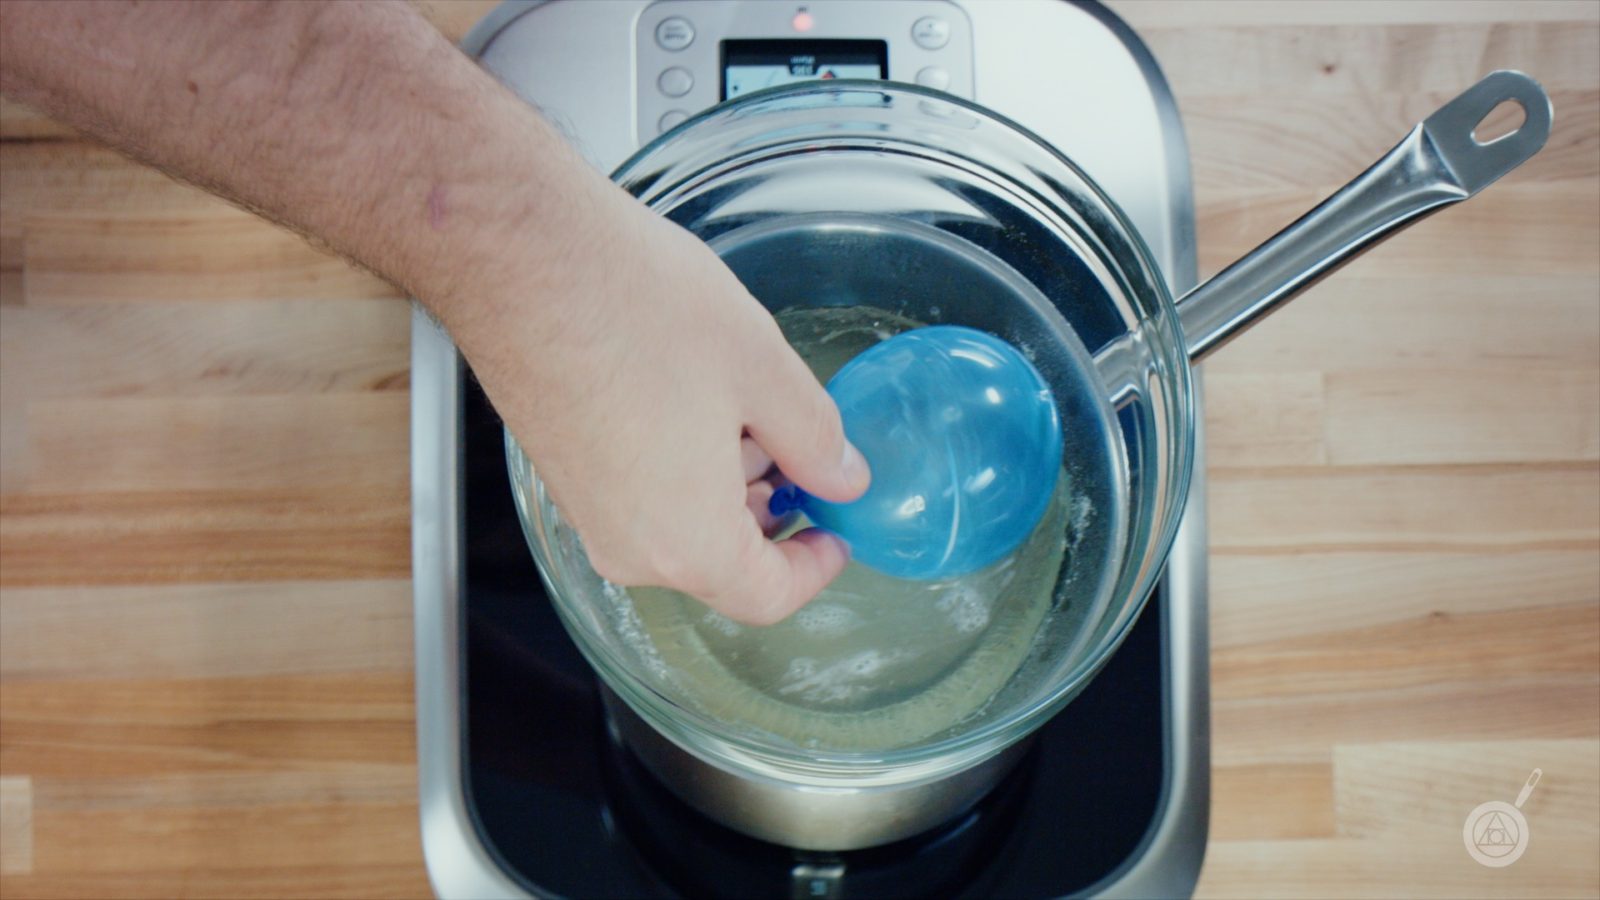
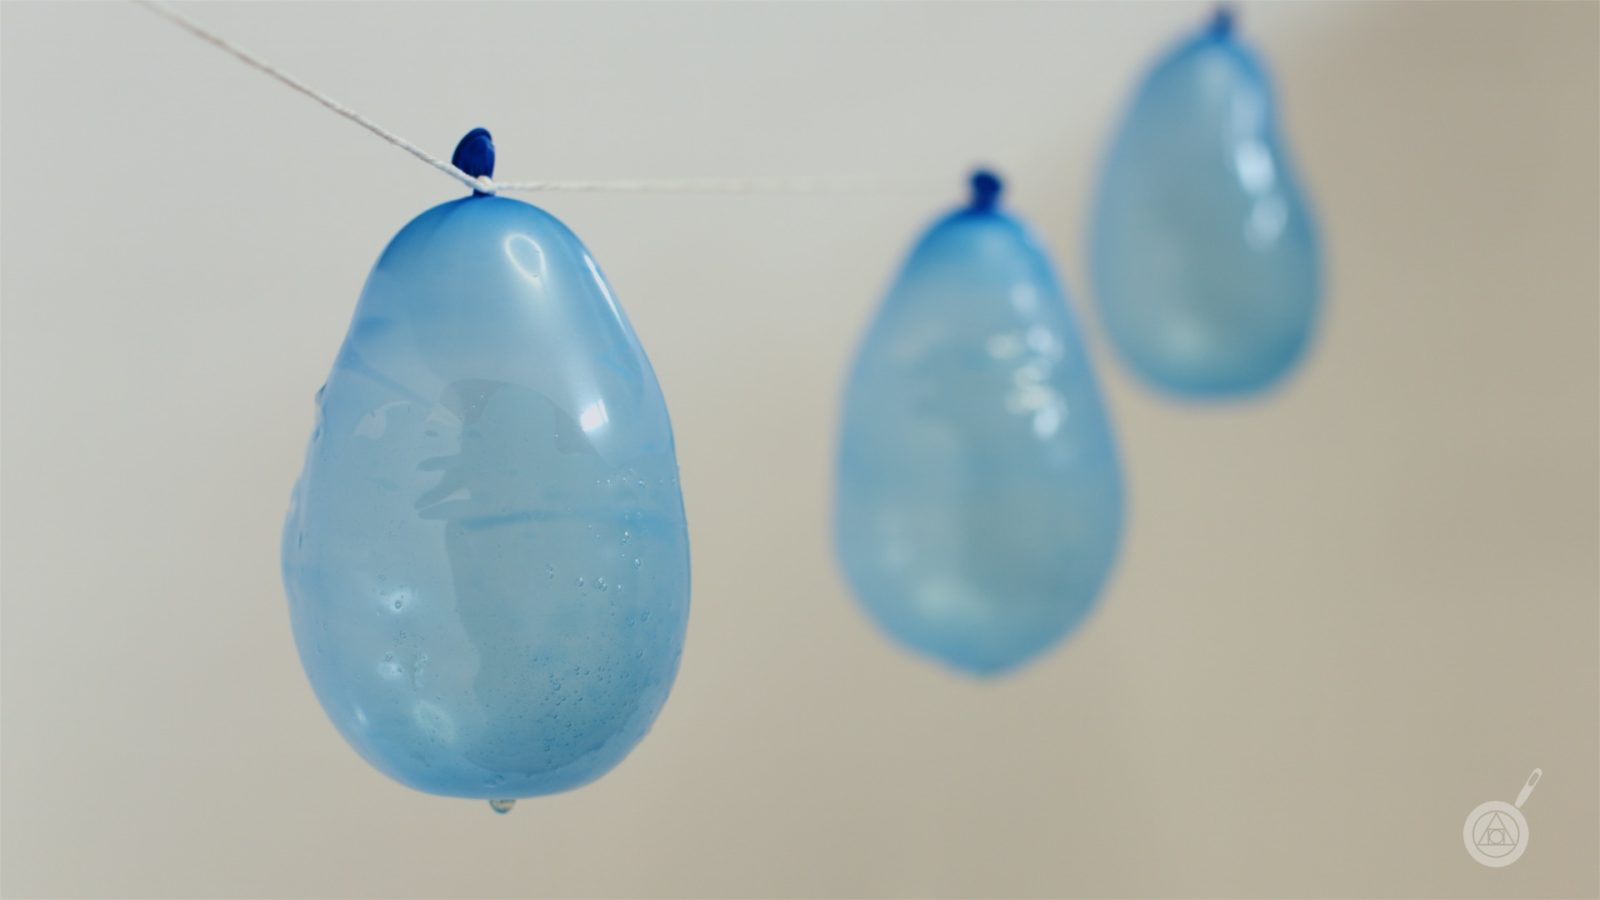
Wait a minute and then coat it a second time. Hang each balloon from the string in a cool, dry place to allow it to dry.
If the gelatin cools too much and starts to solidify, simply reheat it briefly in the double boiler or in the microwave for about 10 seconds (provided it is not in a metal container).
5. Dry the globesTie a piece of string to the end of each balloon. Allow the balloons to hang for 2 days.
 The gelatin must be completely dry – it should feel hard to the touch and not at all tacky.
6. Separate the globes from the balloons
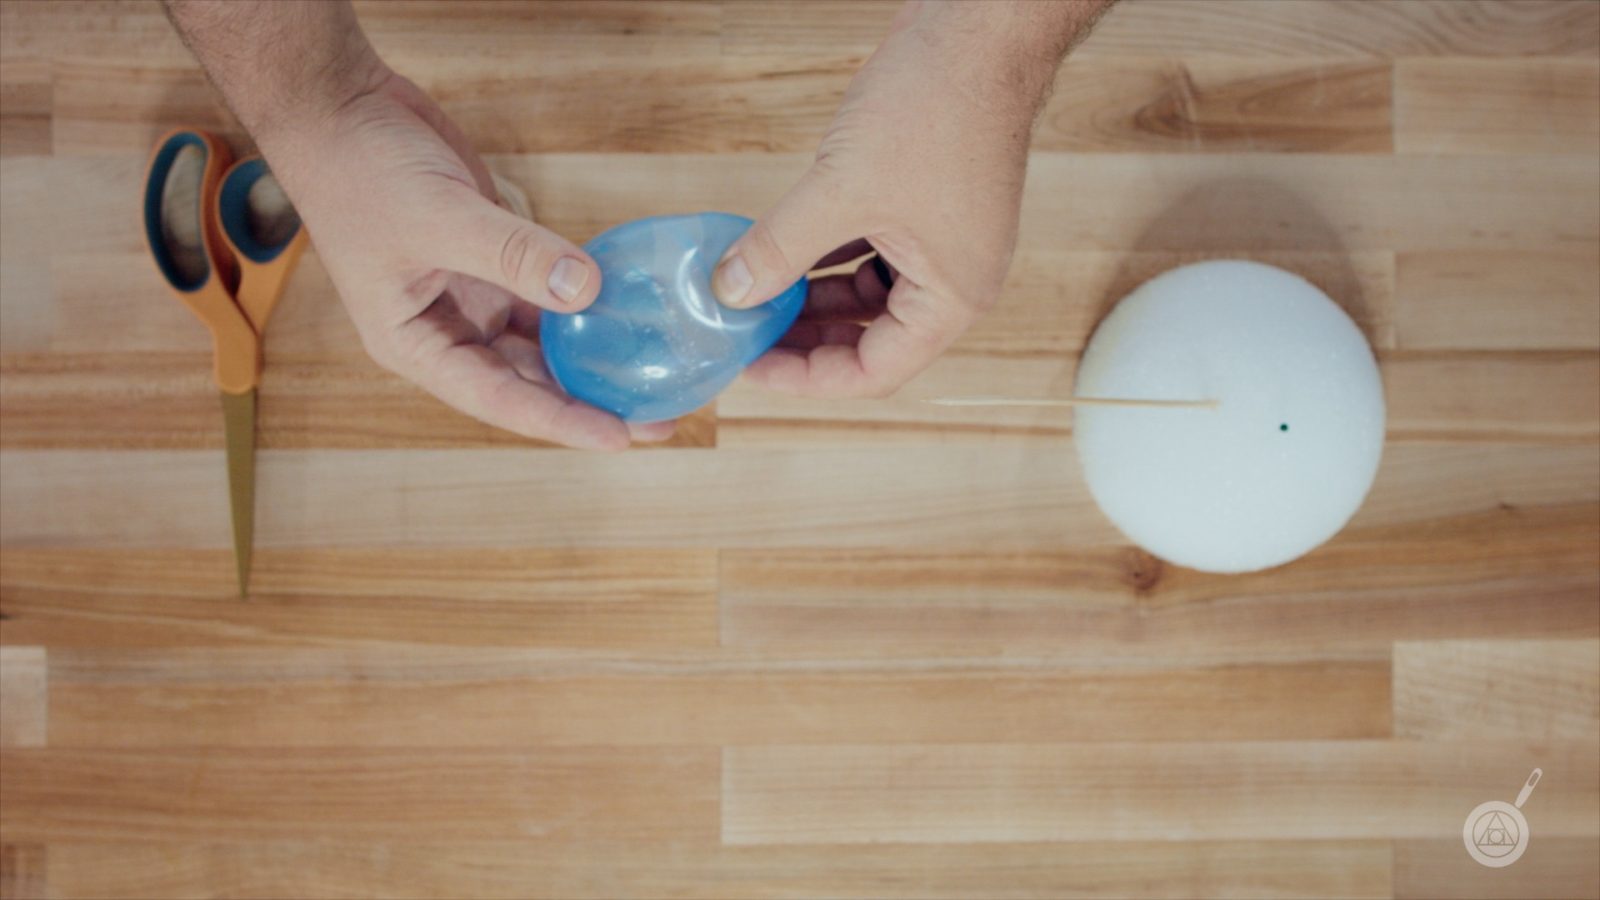
The key to this step is patience. Rushing can lead to breaking the globes
Start by separating the edge of the globe from the balloon by gently pressing down on the balloon to release the edge. Once the edge is separated all the way around, place a piece of Scotch tape on the exposed part of the balloon. Poke a hole through the tape into the balloon with a needle or small pin.
As the balloon slowly deflates, carefully remove it from the glove.
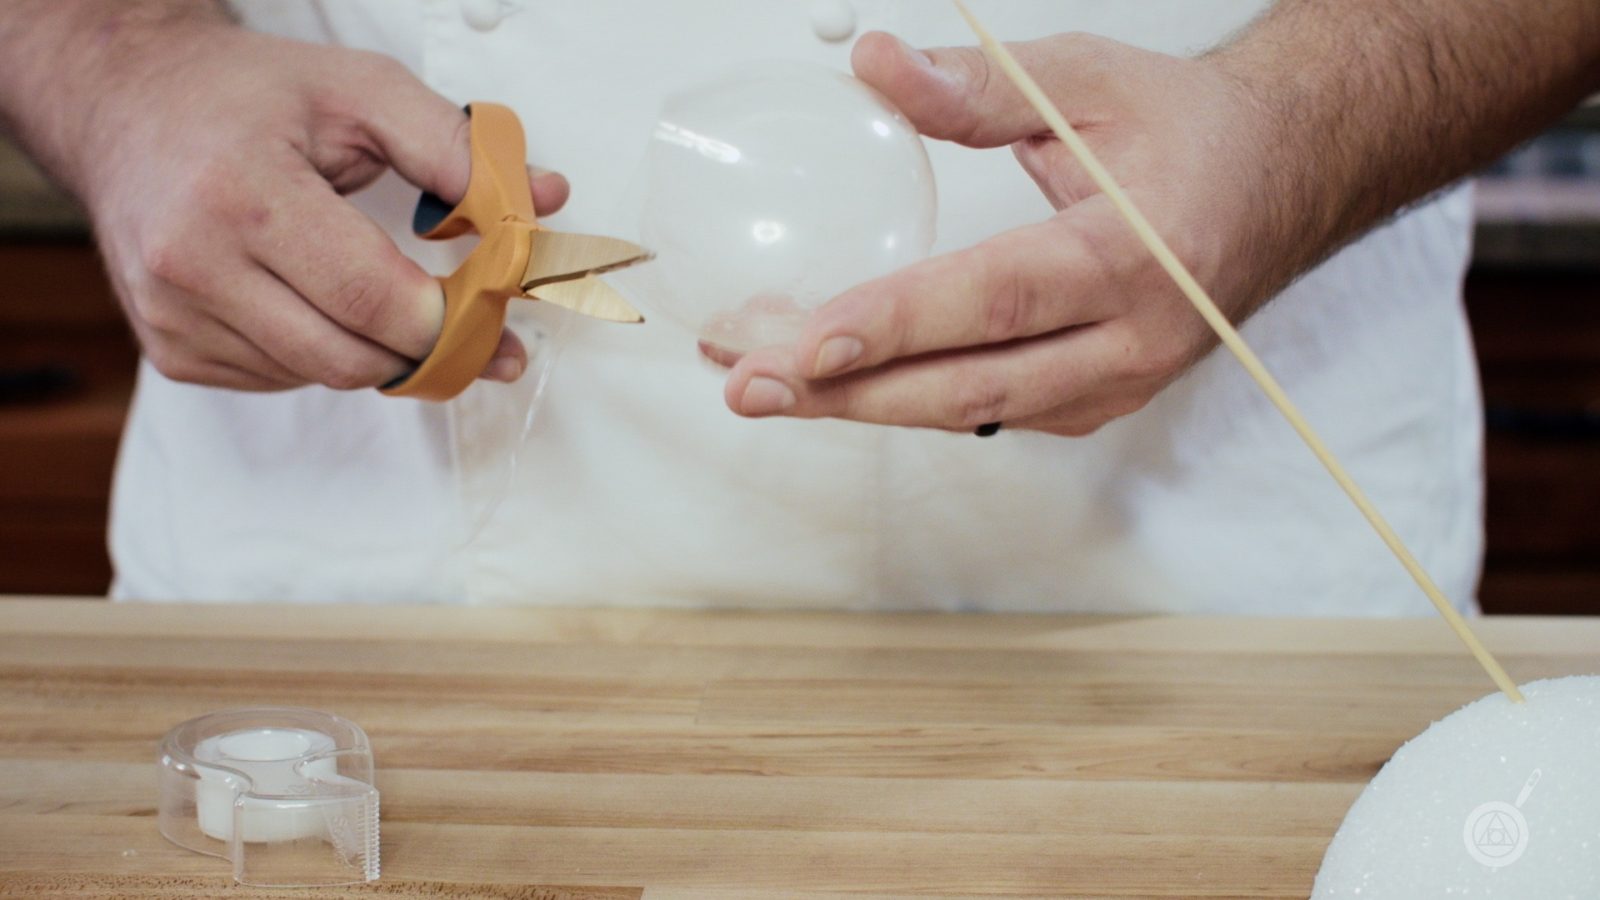
Trim the bottom of the gloves with scissors so it will sit flat on top of a cupcake.
7. Store
The gelatin gloves will keep indefinitely if stored in a cool, dry place, so they can be made well ahead of time.
-
Assembly.
Buttercream frosting
12 cupcakes
Dried coconut flakes
decorations of choice (see below)
12 gelatin globesPipe or spread some buttercream frosting onto each cupcake. Dip the frosting in the coconut flakes. Decorate with seasonal effects (we chose to pipe snowmen out of buttercream and garnish them with dried currants and candied ginger).
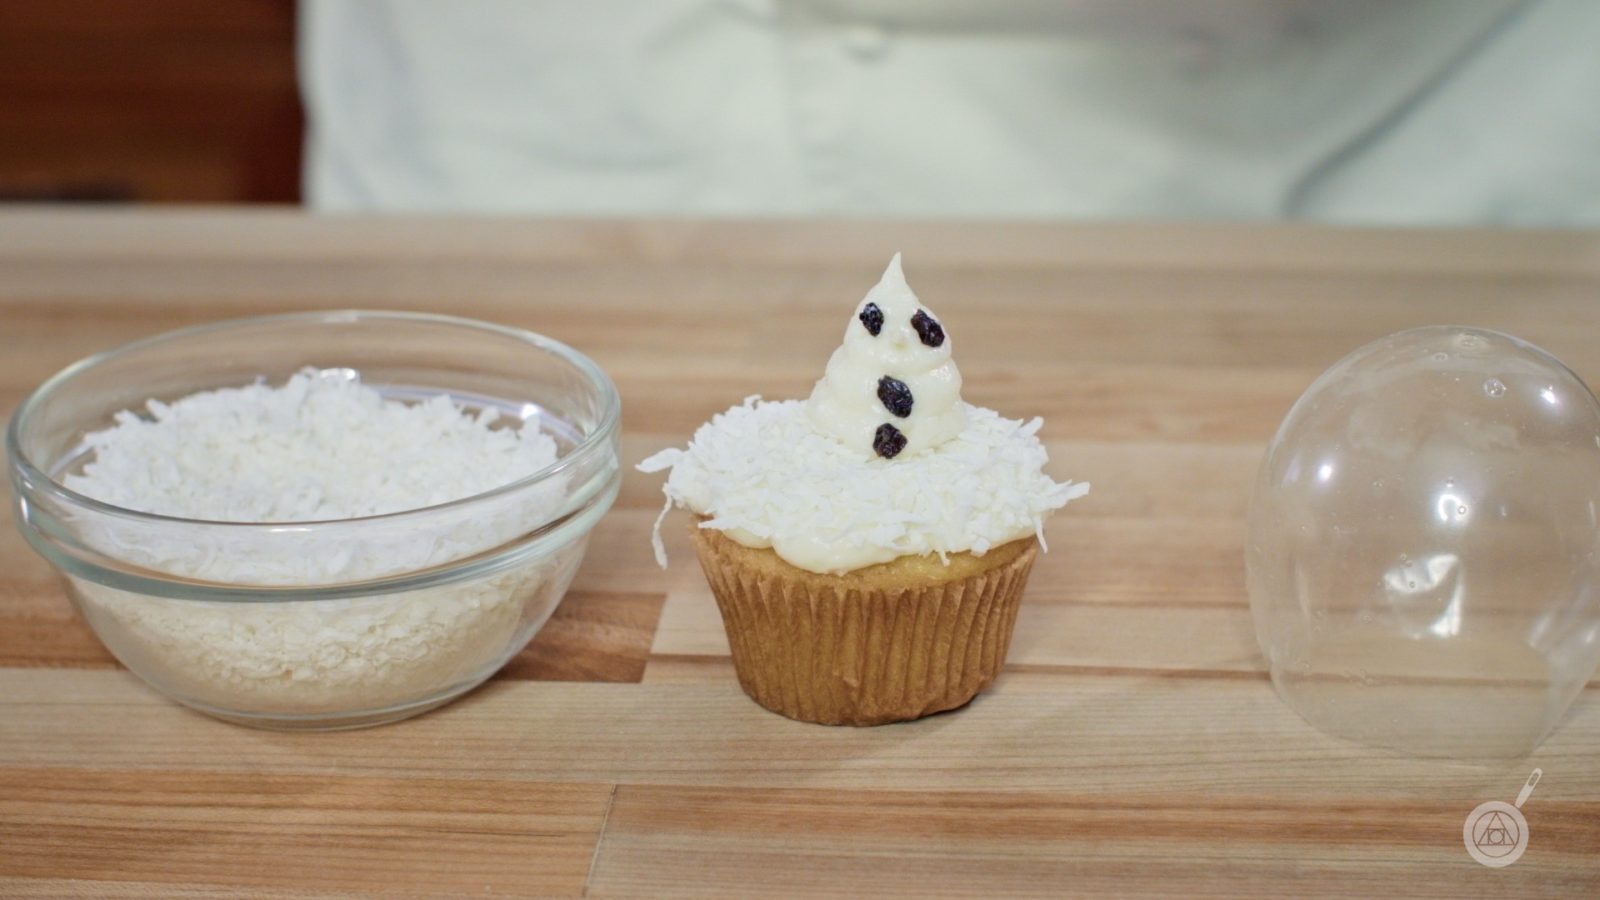
Top each with a gelatin globe. Let the merriment commence!

3 Comments.
[…] Link: As Long As You Love Me So Snow Globe Cupcakes Sticky Toffee Pudding Cake Burgundy Berry Hand […]
You win the Internet for today!
Thanks!