
Get Started with this Base Recipe!
More Spherification Course Content
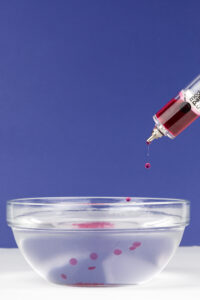
Using a perfect caviar maker, draw the flavorful liquid into the syringe.
Stir the calcium bath to create a helpful ‘current’ when making spheres.
Holding the perfect caviar maker an inch above the surface of the calcium bath, slowly depress the plunger to allow droplets to form and fall into the bath.
Caviar with Rapid Caviar Maker
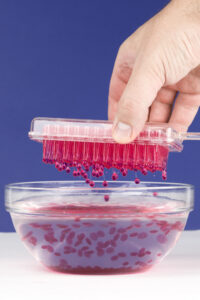
Fill the tray of the rapid caviar maker with flavorful liquid.
Place the rapid caviar maker into the tray and draw the liquid in using the plunger. Draw enough liquid in to fill the rapid caviar maker, but not so much that liquid enters the top chamber of the rapid caviar maker.
Holding the rapid caviar maker about 1 inch from the surface of the bath, slowly depress the plunger to allow droplets to form and fall into the bath.
Cleaning the Rapid Caviar Maker
To clean the rapid caviar maker, fill the tray with a cleaning solution, soapy water will work.
Fill the pipettes with the solution. Be sure not to over-fill the pipettes as the rapid caviar maker does not come apart.
rapidly expel the cleaning solution from the pipettes into the sink or separate bowl. Dab dry on clean paper towel. Repeat until all pipettes are clean.
Creating a Ravioli Sphere
Use a teaspoon or tablespoon to create a larger sphere known as a “ravioli”. Carefully and swiftly pour a the flavorful liquid into the bath as close to the surface of your bath as possible. If the sphere doesn’t immediately sink into the bath use a spherification spoon to baste some of the bath over the top and it will become fully submerged.
Caviar with the Spherificator
Place the flavorful liquid into the top of the Spherificator. Hold the Spherificator about 6 inches above the surface of the setting bath. Move the Spherificator in a circular pattern quickly to prevent clumping. Dispense the spheres into the setting bath.
Allow Caviar or Spheres to Set
Allow the smaller “pearls” or “caviar” to set in the calcium bath for 30 seconds.
For the larger “ravioli” sized spheres allow them to set for two minutes. Waiting longer will result in thicker sphere walls, while shorter times result in spheres which break too easily.
Remove and Rinse Caviar or Ravioli
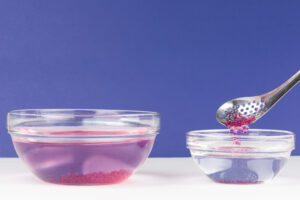
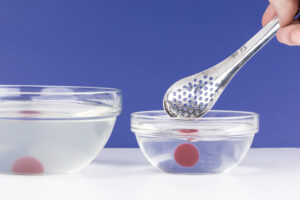
Using the spherification straining spoon, remove the spheres from the bath and transfer to a water bath. This will remove excess calcium chloride from the exterior.
Serve and Store in Flavorful Liquid
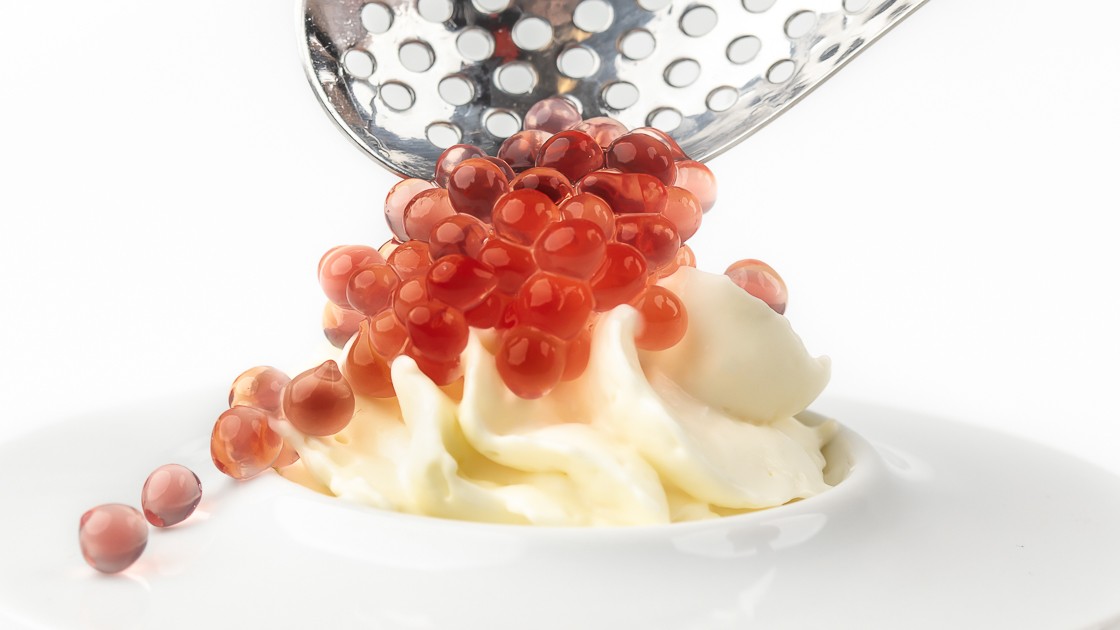
Spheres are best served immediately, and continue to firm over time. Caviar can be stored temporarily in your flavorful liquid base (without the sodium alginate) as the sphere will absorb some of the flavor of the liquid in which they’re stored.
Get Started with this Base Recipe!
More Spherification Course Content
What Is Direct Spherification?
Direct spherification is the original method used in spherification preparations. To start making spheres, a small amount of sodium alginate is added to a flavorful liquid. The flavorful liquid is then dropped into a bath of water and calcium. The calcium starts linking the alginate at the surface of each drop, forming a thin gel that contains the flavorful liquid. This results in beautiful, poppable pearls, caviar, or ravioli sized spheres.
Table Of Contents
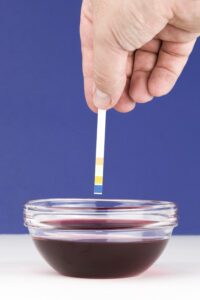
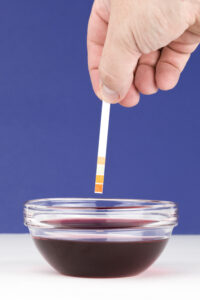
Test the pH of Flavorful Liquid
Using test strips or a calibrated pH meter, test the acidity of the flavorful liquid. Ensure the pH is higher than 4.0.
Add Buffering Agent if Needed
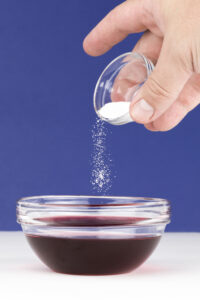
If the pH of the flavorful liquid is too low, add sodium citrate to raise the pH. Add 0.8% sodium citrate to the weight of the flavorful liquid. This will raise the pH to 4.0 . Retest to ensure the liquid is at or above 4.0 before adding sodium alginate.
Mix Sodium Alginate with Flavorful Liquid
Add 0.5-0.7% Perfected sodium alginate by weight to the flavorful liquid and mix well using a blender.
After mixing, allow the mix to set long enough for air bubbles to disperse. This can take a few minutes if using Perfected sodium alginate, and up to 24 hours if using sodium alginate.
Mix Calcium Bath
In a bowl, add 10g calcium chloride per 1 liter of water and whisk until dissolved.
Create Your Caviar or Ravioli
Perfect Caviar Maker
Using a perfect caviar maker, draw the flavorful liquid into the syringe.
Stir the calcium bath to create a helpful ‘current’ when making spheres.
Holding the perfect caviar maker an inch above the surface of the calcium bath, slowly depress the plunger to allow droplets to form and fall into the bath.
Caviar with Rapid Caviar Maker
Fill the tray of the rapid caviar maker with flavorful liquid.
Place the rapid caviar maker into the tray and draw the liquid in using the plunger. Draw enough liquid in to fill the rapid caviar maker, but not so much that liquid enters the top chamber of the rapid caviar maker.
Holding the rapid caviar maker about 1 inch from the surface of the bath, slowly depress the plunger to allow droplets to form and fall into the bath.
Cleaning the Rapid Caviar Maker
To clean the rapid caviar maker, fill the tray with a cleaning solution, soapy water will work.
Fill the pipettes with the solution. Be sure not to over-fill the pipettes as the rapid caviar maker does not come apart.
rapidly expel the cleaning solution from the pipettes into the sink or separate bowl. Dab dry on clean paper towel. Repeat until all pipettes are clean.
Creating a Ravioli Sphere
Use a teaspoon or tablespoon to create a larger sphere known as a “ravioli”. Carefully and swiftly pour a the flavorful liquid into the bath as close to the surface of your bath as possible. If the sphere doesn’t immediately sink into the bath use a spherification spoon to baste some of the bath over the top and it will become fully submerged.
Caviar with the Spherificator
Place the flavorful liquid into the top of the Spherificator. Hold the Spherificator about 6 inches above the surface of the setting bath. Move the Spherificator in a circular pattern quickly to prevent clumping. Dispense the spheres into the setting bath.
Allow Caviar or Spheres to Set
Allow the smaller “pearls” or “caviar” to set in the calcium bath for 30 seconds.
For the larger “ravioli” sized spheres allow them to set for two minutes. Waiting longer will result in thicker sphere walls, while shorter times result in spheres which break too easily.
Remove and Rinse Caviar or Ravioli
Using the spherification straining spoon, remove the spheres from the bath and transfer to a water bath. This will remove excess calcium chloride from the exterior.
Serve and Store in Flavorful Liquid
Spheres are best served immediately, and continue to firm over time. Caviar can be stored temporarily in your flavorful liquid base (without the sodium alginate) as the sphere will absorb some of the flavor of the liquid in which they’re stored.